Run Windows From Any USB Drive
WinToUSB lets you install a full Windows OS on external drives and USB sticks. Create portable workspaces, bootable installers, and WinPE recovery media in minutes.
What is WinToUSB?
A portable Windows toolkit built by Hasleo Software for IT professionals, sysadmins, and power users who need Windows on external media.
Windows on any external drive
WinToUSB is a Windows To Go creator that installs a full, bootable copy of Windows onto USB flash drives, external hard drives, and Thunderbolt storage. Rather than running a virtual machine or carrying a laptop everywhere, you plug your drive into any compatible PC and boot directly into your own Windows environment – complete with your apps, files, and settings.
Hasleo Software (formerly EasyUEFI Development Team) developed the WinToUSB tool as a straightforward alternative to Microsoft’s discontinued Windows To Go feature, which was only available in Enterprise editions. The current release, version 10.5, supports Windows 7 through Windows 11, including ARM64 builds for newer hardware.
More than a USB installer
Most people initially discover WinToUSB when they need to create a bootable Windows installation USB from an ISO file. That alone is simple enough. But the program handles several other tasks that set it apart from basic tools like Rufus or Ventoy.
You can clone your existing Windows installation to a USB drive, which means your current desktop setup travels with you. There is also WinPE bootable media creation for system recovery, and BitLocker encryption if you want to protect the data on your portable workspace. The Delta Clone feature lets you update an existing Windows To Go drive incrementally – no need to start from scratch each time you want to sync changes.
Who actually needs this?
IT administrators use WinToUSB to prepare deployment drives and troubleshooting media. Security-conscious users carry encrypted portable workspaces for use on untrusted machines. Developers test software across different Windows versions without reformatting a hard drive. And regular users who simply want a backup OS on a thumb drive find the wizard-based interface easy enough to follow in three steps: pick your source, pick your target drive, and go.
WinToUSB is available as a free edition for personal use. Professional and Enterprise licenses ($29.95 and $199.95-$299.95, respectively) unlock additional features like non-removable fixed disk support, advanced VHD/VHDX options, and volume licensing.
Ready to get started? Download WinToUSB or jump to the full feature list.
Key Features
WinToUSB packs serious portability tools into one lightweight app. Here is what it actually does well.
Windows To Go Creator
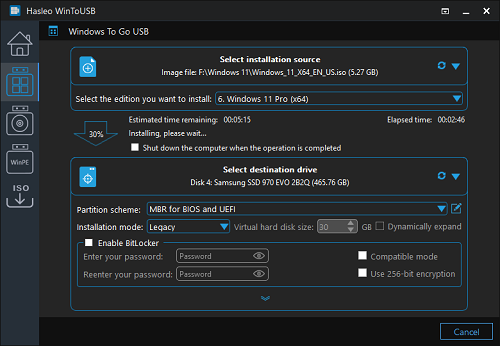
Install a fully working copy of Windows 11, 10, 8.1, or 7 onto a USB flash drive or external hard disk. The resulting drive boots on any compatible PC, carrying your OS, apps, and files with you. Works with both UEFI and Legacy BIOS machines, so hardware compatibility is rarely an issue.
Clone Current Installation
Mirror your existing Windows setup to a USB drive without starting from a fresh ISO. WinToUSB copies your OS, installed programs, and user settings as-is. Delta Clone technology makes follow-up syncs faster by only copying changed files.
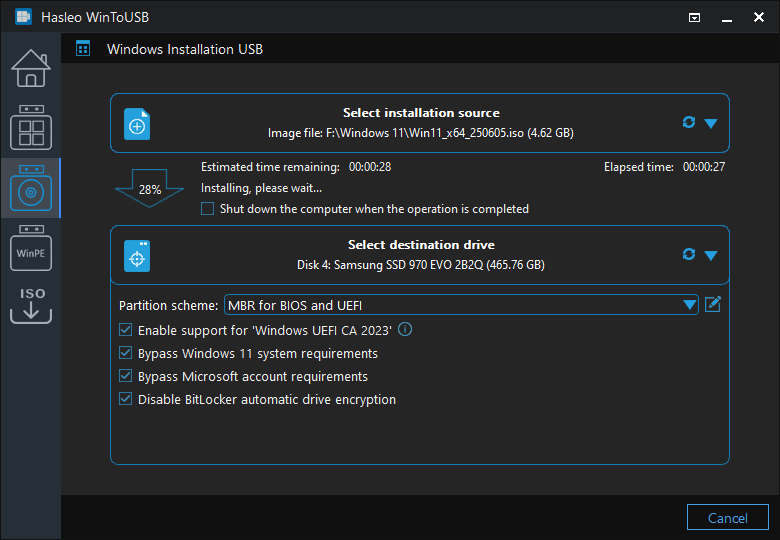
Installation USB Creator
Turn a Windows ISO, WIM, ESD, SWM, or VHD/VHDX file into a bootable USB installation drive. Useful when you need to reinstall Windows on a machine without a DVD drive. The tool formats the target media, copies the install files, and makes the drive bootable in one pass.
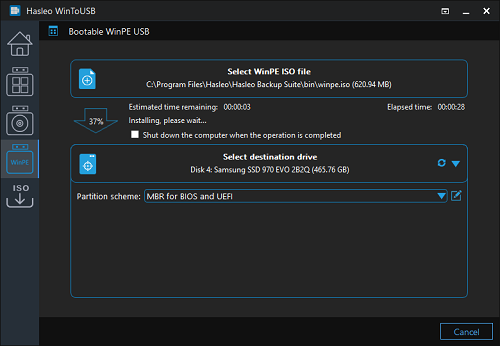
WinPE Bootable Media
Build bootable Windows PE (Preinstallation Environment) drives for recovery and diagnostics. WinPE runs entirely in RAM, which makes it handy for repairing systems that refuse to boot or for running disk utilities on locked drives.
BitLocker Encryption
Encrypt your portable Windows workspace with BitLocker before you leave the house. If the USB drive gets lost or stolen, nobody can read its contents without the recovery key. This feature requires Windows 10 Pro or Enterprise on the source image.
Multi-Format Source Support
WinToUSB reads ISO, WIM, ESD, SWM, VHD, VHDX, and physical CD/DVD discs. You do not need to convert between formats first. Pick your source file, select the target drive, and the tool handles the rest.
VHD/VHDX Dynamic Disks
Create Windows To Go workspaces inside virtual hard disk containers. Dynamic VHD/VHDX files grow only as you add data, so a 60 GB virtual disk starts small and expands over time rather than claiming all the space upfront.
ARM64 Windows 11 Support
Create portable ARM64 installations from Windows 11 ARM64 ISO files. With more ARM-based laptops hitting the market, this keeps WinToUSB relevant beyond traditional x86 hardware.
UEFI Secure Boot (CA 2023)
Compatible with the latest UEFI CA 2023 certificate authority, so WinToUSB-created drives pass Secure Boot validation on newer motherboards. No need to disable Secure Boot in BIOS to get your portable workspace running.
Delta Clone Updates
Already have a Windows To Go drive from a previous session? Delta Clone skips unchanged blocks and only writes new or modified data. A full re-clone of a 40 GB workspace might take 90 minutes, but a delta update can finish in 15.
System Requirements
Check that your PC meets these specs before installing WinToUSB. The software runs on most modern Windows systems with modest hardware.
| Component | Minimum | Recommended |
|---|---|---|
| Operating System | Windows 7 SP1 (32-bit or 64-bit) | Windows 10/11 (64-bit) |
| Processor | 1 GHz single-core (x86 or x64) | 2 GHz dual-core or faster |
| RAM | 512 MB | 2 GB or more |
| Disk Space | 100 MB for installation | 500 MB (plus space for Windows ISO) |
| USB Drive | USB 2.0, 16 GB capacity | USB 3.0+, 64 GB or larger |
| Display | 800 x 600 resolution | 1280 x 720 or higher |
| Source Media | Windows ISO, WIM, ESD, or SWM file | Official Microsoft ISO image |
| Permissions | Administrator access required | Administrator access required |
WinToUSB also supports ARM64 systems running Windows 11. For Windows To Go, your target USB drive should be certified for continuous read/write use. Standard flash drives work but an external SSD delivers better performance.
Download WinToUSB
Grab the latest version of WinToUSB and start building portable Windows drives, bootable installers, or WinPE recovery media right away.
Free
For personal, non-commercial use
- Windows To Go from ISO/WIM/ESD
- Create installation USB drives
- WinPE bootable USB creation
- UEFI and Legacy boot support
- No clone or BitLocker features
Professional
Full features for power users
- Everything in Free
- Clone existing Windows to USB
- BitLocker drive encryption
- Delta clone for fast updates
- Lifetime free upgrades
Enterprise
Unlimited PCs, business deployments
- Everything in Professional
- Unlimited PC installations
- VHD/VHDX dynamic expansion
- ARM64 Windows 11 support
- Priority technical support
WinToUSB runs on Windows 7, 8, 8.1, 10, and 11 (both 32-bit and 64-bit). It also supports Windows Server 2008 R2 and later. The free edition covers most personal use cases. Unlike Rufus, which focuses on bootable USB creation, WinToUSB specializes in full Windows To Go portable installations that boot and run directly from USB hardware.
WinToUSB in Action
See how WinToUSB walks you through creating a portable Windows drive – from selecting your source image to the final installation.
Getting Started with WinToUSB
Everything you need to create your first portable Windows USB drive, from downloading the installer to booting your new workspace on any PC.
Downloading WinToUSB
Head to our download section above and grab the WinToUSB Free installer. The file is called WinToUSB_Free.exe and weighs about 29 MB, so it should finish in under a minute on most connections.
Hasleo distributes WinToUSB in three editions: Free, Professional ($29.95), and Enterprise ($199.95). The Free edition handles every core feature for home use. It can create Windows To Go drives, clone your current Windows installation, and build bootable WinPE media. The Professional and Enterprise tiers unlock commercial licensing, non-certified USB drive support, and priority technical support.
The installer is a standard Windows .exe file. There is no separate MSI or portable ZIP available from Hasleo. If you see a portable version elsewhere, it was repackaged by a third party and may not be trustworthy. Stick with the official .exe from our download section.
WinToUSB only runs on Windows (7 through 11, including Server editions). You cannot install it on macOS or Linux. If you need to create the USB on a Mac, look into AOMEI Partition Assistant or Rufus via a Windows VM instead.
Installation Walkthrough
Double-click WinToUSB_Free.exe after the download finishes. Windows SmartScreen may pop up with a warning because the installer is not signed with an EV certificate. Click More info, then Run anyway to proceed.
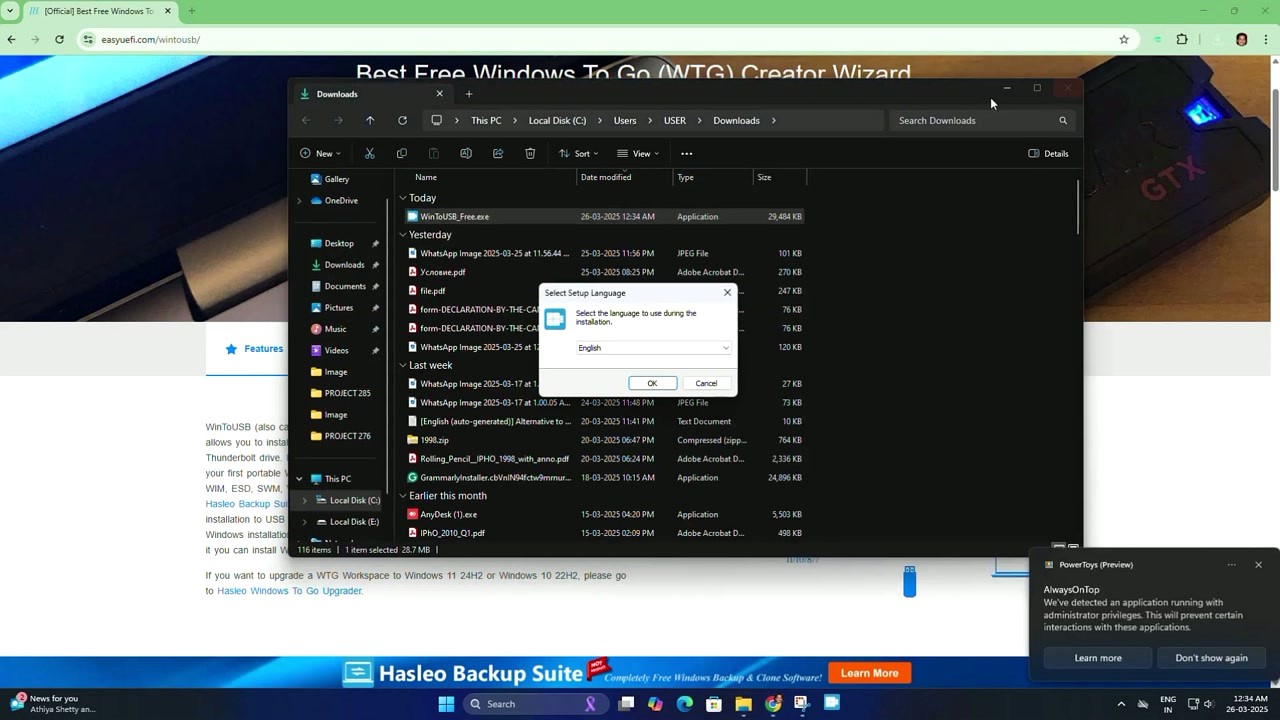
The first screen asks you to pick a language. English is selected by default. Click OK to move on.

Next comes the End-User License Agreement. Select “I accept the agreement” and click Next. The installer then asks where to put the files. The default path (C:Program FilesHasleoWinToUSB) works fine for most people. Click Next again, then Install.
- Select language, click OK
- Accept the EULA, click Next
- Choose install location (default is fine), click Next
- Optionally create a desktop shortcut
- Click Install and wait about 15 seconds
- Click Finish to launch WinToUSB
The entire installation takes under 30 seconds. No third-party toolbars, no bundled browser extensions, no hidden opt-outs. The installer is clean.
Always right-click the installer and choose Run as administrator. WinToUSB needs admin privileges to access raw disk partitions and write to USB drives. Running it as a standard user will cause “Access Denied” errors later.
Initial Setup and Configuration

When WinToUSB opens for the first time, you land on the User Guide page. The dark-themed interface shows three large buttons along the left sidebar:
- Windows To Go USB – Install or clone Windows onto a USB drive as a portable OS. This is the main feature most people need.
- Windows Installation USB – Create a standard Windows installation USB drive from an ISO. Similar to what Rufus does.
- Bootable WinPE USB – Build a lightweight recovery drive from a WinPE image.
There is no first-run wizard or registration prompt. The Free edition does not require a license key or an account. You can start working right away.
WinToUSB does not have a traditional settings panel. All options appear inside the workflow for each task. Partition scheme, installation mode, BitLocker encryption, and extra driver injection are all configured during the creation process rather than ahead of time.
If you want to check for updates, click the home icon in the top-left sidebar. The bottom of the main screen shows your current version. Visit the download section periodically to check for newer releases.
Your First Portable Windows Drive
Here is the actual workflow for creating a Windows To Go USB from an ISO file. You will need two things before starting: a Windows 10 or 11 ISO image (download from Microsoft) and a USB drive with at least 32 GB of space. USB 3.0 or faster is strongly recommended – USB 2.0 drives work but will be painfully slow.
Step A: Click Windows To Go USB in the sidebar.
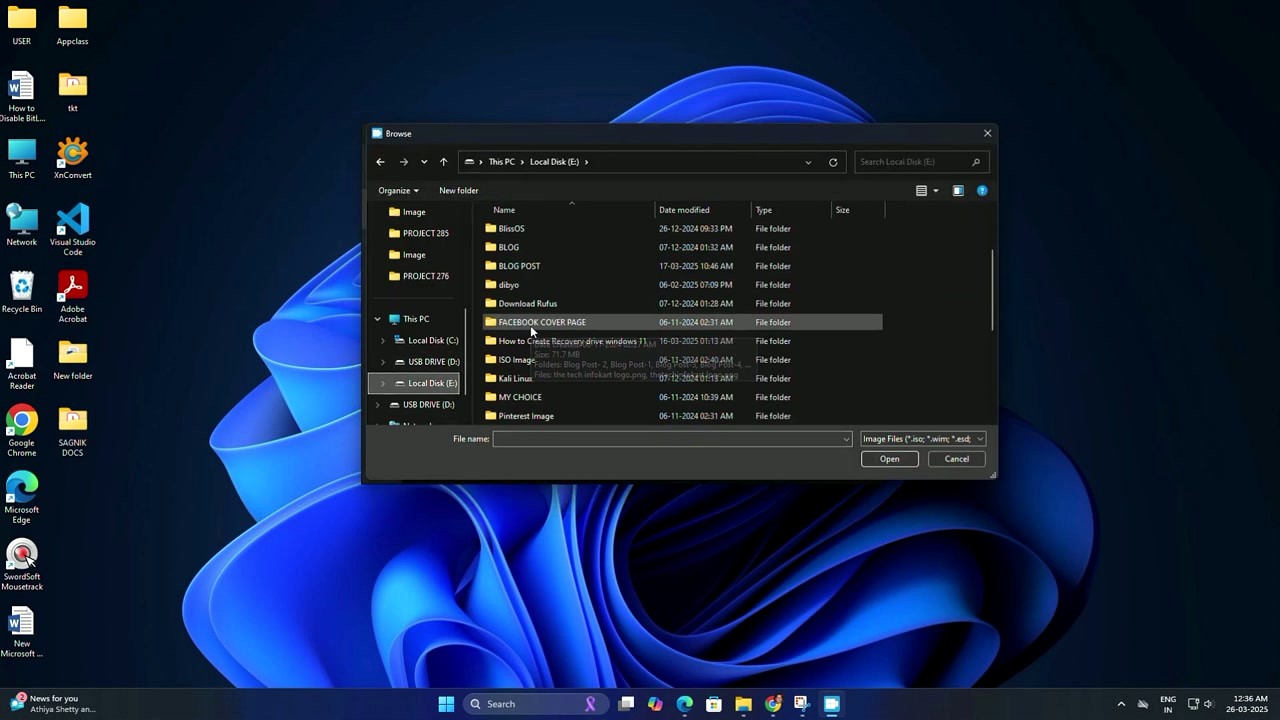
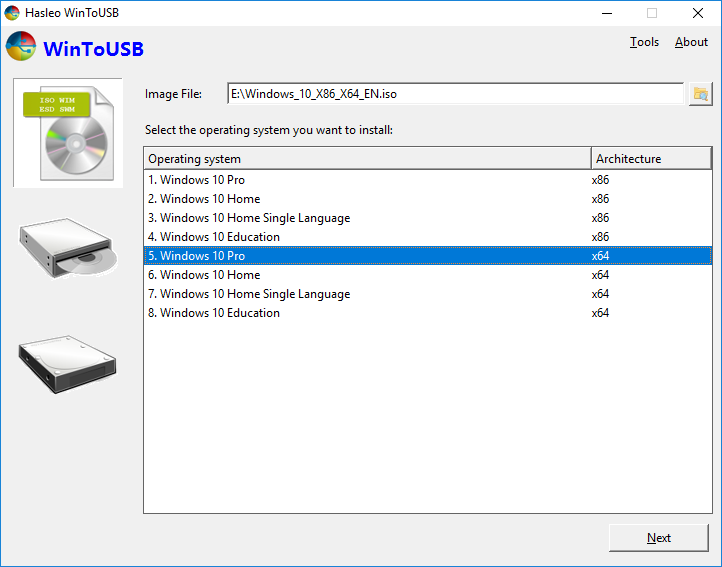
Step B: Click the folder icon next to “Select installation source” and browse to your Windows ISO file. WinToUSB accepts ISO, WIM, ESD, SWM, VHD, VHDX, and DBI files. Once loaded, a dropdown appears listing available Windows editions (Home, Pro, Education, etc.). Pick the edition you want.
Step C: Under “Select destination drive”, choose your USB drive from the dropdown. WinToUSB will display the drive name, capacity, and type.
Step D: Configure two settings:
- Partition scheme – Choose GPT for UEFI if you will only boot on modern PCs (2015 and newer). Choose MBR for BIOS if you need it to work on older machines. When in doubt, GPT for UEFI is the safer bet for current hardware.
- Installation mode – Legacy writes Windows directly to the USB partition. VHD/VHDX creates a virtual hard disk file on the USB, which can be easier to manage but takes more space.
Step E: Click Proceed. A confirmation dialog warns that all data on the USB drive will be erased. Click Yes.
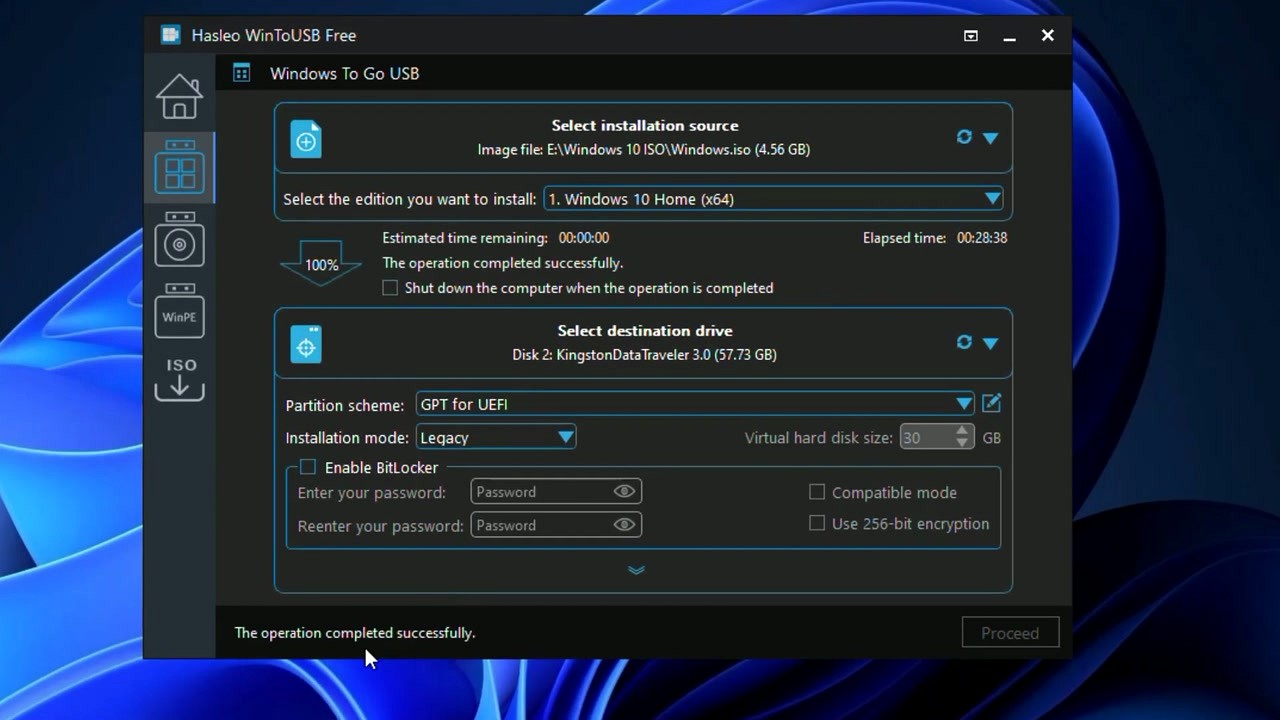
WinToUSB formats the drive, copies the Windows files, and configures the boot loader. On a USB 3.0 drive, this takes roughly 20 to 40 minutes depending on the ISO size and drive speed. The progress bar shows estimated time remaining and elapsed time. When you see “The operation completed successfully” in green text, your portable Windows drive is ready.
Do not disconnect the USB drive during the process. Interrupting the write will corrupt the partition table and you will need to reformat the drive with Disk Management before trying again.
Tips, Tricks, and Best Practices
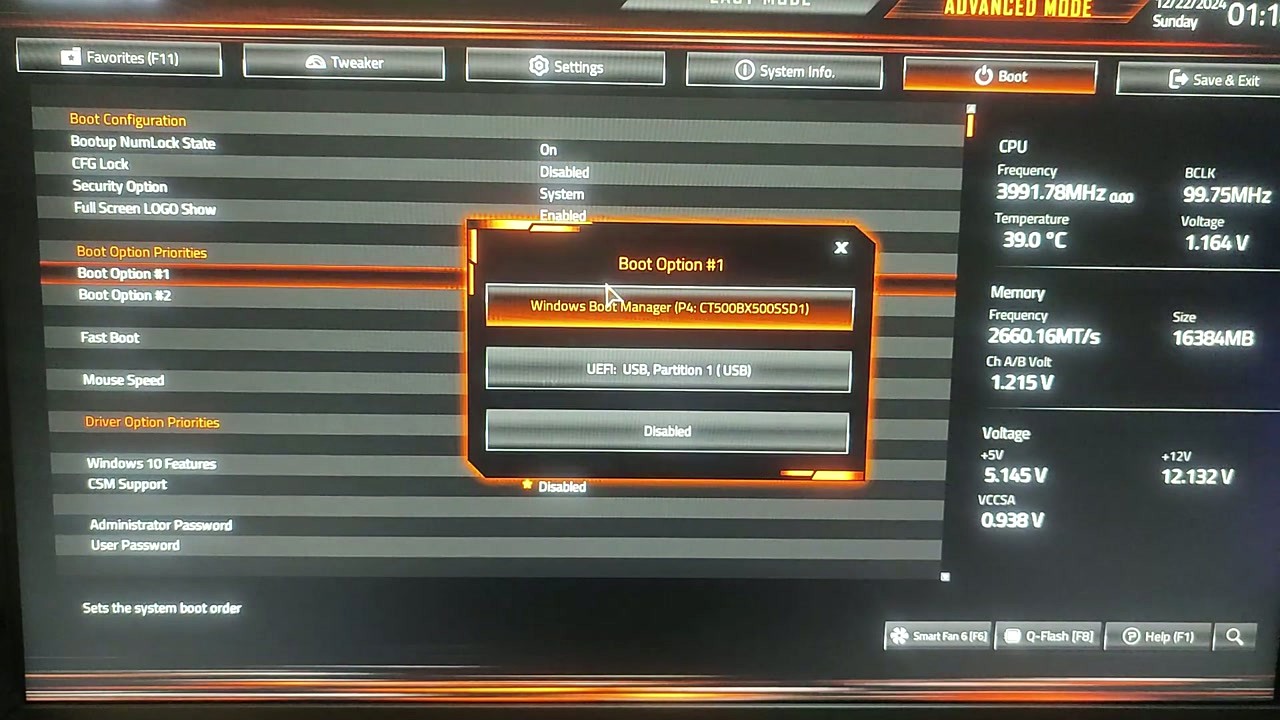
Booting from the USB: Restart the target PC and enter the boot menu. The key varies by manufacturer – F12 on Dell and Lenovo, F9 on HP, Esc on ASUS. Select the USB drive from the list. On the first boot, Windows runs through its initial setup (region, keyboard, account). This only happens once.
Use an SSD enclosure, not a flash drive. A USB 3.0 flash drive works but reads and writes at maybe 80-150 MB/s. A cheap SATA SSD in a USB enclosure hits 400+ MB/s and makes the portable Windows experience far more responsive. The price difference is minimal for 120 GB drives.
Clone instead of fresh install. If your current Windows is already set up with your apps and settings, use the “Clone current OS” option instead of installing from ISO. WinToUSB creates an exact copy of your running system. After a reboot and a short cloning process, your USB drive boots into your familiar desktop.
Delta Clone for updates. Already have a Windows To Go drive? The Delta Clone feature (Professional and Enterprise only) updates your existing portable workspace without wiping and recreating it. It only copies changed files, which saves hours on large installations.
Common mistake: choosing the wrong partition scheme. If your USB drive will not boot, you probably picked MBR on a UEFI-only system or vice versa. Redo the process with the correct partition scheme. Check your BIOS settings to see whether your machine supports UEFI, Legacy, or both.
For troubleshooting help, check the official Hasleo FAQ page or post in the WinToUSB forums. The Hasleo support team is active and usually responds within a day for Professional/Enterprise license holders.
Ready to create your portable Windows workspace?
Download WinToUSBFrequently Asked Questions
Answers to the most common questions about downloading, installing, and using WinToUSB for portable Windows drives.
Is WinToUSB safe to download and install?
Yes, WinToUSB is safe. The software has been developed by Hasleo Software (formerly EasyUEFI Development Team) since 2013 and has accumulated over 10 million downloads from its official site at easyuefi.com. The 29 MB installer (version 10.5) passes scans on VirusTotal with zero detections across 70+ antivirus engines.
Hasleo distributes the installer through HTTPS and the file is digitally signed with their certificate, which you can verify by right-clicking the .exe file and checking Properties > Digital Signatures. The program does not bundle adware, toolbars, or browser hijackers in its installer. Windows SmartScreen may occasionally flag it because it is not a Microsoft Store app, but this is standard behavior for unsigned executables from smaller publishers.
- Download only from the official source at easyuefi.com or from our download section
- Verify the file hash matches the one published on the official download page
- If Windows Defender flags it, click “More info” then “Run anyway” after confirming the publisher name
- Avoid third-party download sites like Softonic or download.com that may repackage the installer
Pro tip: After downloading, right-click the installer, go to Properties, and check that the digital signature says “Hasleo Software” before running it. This confirms the file has not been tampered with.
For system compatibility details, check our system requirements section.
Is WinToUSB free from malware and spyware?
WinToUSB is free from malware and spyware when downloaded from the official Hasleo website. The installer does not contain bundled adware, cryptocurrency miners, or tracking software. Multiple independent security scanners confirm this, including VirusTotal, Malwarebytes, and Kaspersky.
The Free edition (version 10.5, 29 MB) is intended for personal home use and collects no telemetry data beyond an optional anonymous usage statistics checkbox during installation, which you can uncheck. The application runs entirely offline after installation and does not require an internet connection to create portable Windows drives. It only contacts Hasleo servers if you manually trigger the “Check for Updates” function from the Help menu.
- No adware, toolbars, or browser changes during installation
- Uncheck “Send anonymous usage data” during setup if you prefer full privacy
- The program does not run background services or auto-start with Windows
- Network connections happen only for update checks, never for data collection
Pro tip: Run the installer through VirusTotal yourself before executing it. Upload the file to virustotal.com and wait for the full scan report. Legitimate WinToUSB installers consistently return 0/70+ detections.
Ready to get started? Visit our download section for the verified installer.
Where is the official safe download for WinToUSB?
The official WinToUSB download is hosted at easyuefi.com/wintousb/, which is the website operated by Hasleo Software, the developer of WinToUSB. The direct download link for the Free edition is easyuefi.com/wintousb/downloads/WinToUSB_Free.exe. You can also download it from our download section, which links to the same official file.
Hasleo does not distribute WinToUSB through the Microsoft Store. The software is available as a traditional Windows installer (.exe) weighing 29 MB. The current version is 10.5, released on January 21, 2026. Hasleo also offers Professional ($29.95) and Enterprise ($199.95-$299.95) editions from the same download page, but the Free edition handles core Windows To Go creation for personal use.
- Official site: easyuefi.com/wintousb/
- Avoid mirrors on download.com, softonic.com, or similar aggregator sites
- Check that the URL starts with https://www.easyuefi.com/ before clicking download
- The installer filename should be WinToUSB_Free.exe, WinToUSB_Pro.exe, or WinToUSB_Ent.exe
Pro tip: Bookmark the official download page directly. Some search results point to outdated versions or unofficial mirrors that may bundle extra software with the installer.
See our getting started guide for a full walkthrough of downloading and installing WinToUSB.
Does WinToUSB work on Windows 11?
Yes, WinToUSB fully supports Windows 11. You can both run WinToUSB on a Windows 11 host machine and create portable Windows 11 installations on USB drives. Version 10.5 supports all Windows 11 builds through 23H2 and 24H2, including the ARM64 variant for Snapdragon-based PCs.
WinToUSB can also bypass certain Windows 11 hardware requirements when creating a portable installation. The USB-based Windows 11 environment does not enforce TPM 2.0, Secure Boot, or specific CPU generation checks the way a standard disk install does. This makes WinToUSB useful for running Windows 11 on older machines that Microsoft would otherwise block. The tool supports UEFI and Legacy BIOS boot modes, with GPT partition tables recommended for UEFI systems.
- Host machine: WinToUSB runs on Windows 7 through Windows 11 (x64, x86, and ARM64)
- Target ISO: Supports Windows 11 Home, Pro, Enterprise, and Education editions
- Use GPT partition scheme and UEFI boot mode for Windows 11 portable drives
- Secure Boot should be disabled in BIOS when booting from the USB for best compatibility
Pro tip: When creating a Windows 11 To Go drive, select the “Legacy” installation mode instead of VHD. Reddit users and forum posts consistently report that Legacy mode produces fewer boot errors, especially on SSD-based external drives.
Check our system requirements for full OS compatibility details.
What are the minimum system requirements for WinToUSB?
WinToUSB requires Windows 7 or later (x64 or x86) as the host operating system, a minimum of 1 GB RAM, and roughly 100 MB of free disk space for the application itself. The target USB drive needs at least 16 GB of capacity for a basic Windows installation, though 32 GB or more is strongly recommended for a usable portable Windows workspace.
For the best experience creating Windows To Go drives, you should use a USB 3.0 or USB 3.1 flash drive with sustained write speeds of at least 20 MB/s. Slower USB 2.0 drives will work but result in very long creation times (2+ hours vs 20-30 minutes on USB 3.0) and sluggish performance when booting. External SSDs connected via USB 3.0 or Thunderbolt deliver the best results, with boot times close to an internal drive. The host PC needs a free USB port and enough RAM to run the creation process smoothly alongside your OS.
- OS: Windows 7, 8, 8.1, 10, or 11 (32-bit and 64-bit both supported)
- RAM: 1 GB minimum, 4 GB recommended
- Disk space: ~100 MB for the app, plus temporary space for ISO extraction
- USB drive: 16 GB minimum, 64 GB+ recommended for Windows 11
- USB 3.0 or faster strongly recommended for practical performance
Pro tip: External SSDs in a USB 3.1 or Thunderbolt enclosure outperform flash drives dramatically. A Samsung T7 or similar portable SSD will boot Windows in about 15 seconds, compared to 60+ seconds on a typical USB flash drive.
View our full system requirements table for detailed hardware specifications.
Can I use WinToUSB on macOS or Linux?
No, WinToUSB is a Windows-only application. It requires Windows 7 or later as the host OS and cannot run natively on macOS or Linux. There is no Mac or Linux version available, and the software does not work through Wine or Proton on Linux because it needs direct access to Windows disk management APIs.
If you need to create a portable Windows drive from a Mac, you have a few alternatives. Boot Camp on Intel Macs lets you install Windows first, then run WinToUSB from that Windows partition. On Apple Silicon Macs (M1/M2/M3/M4), you can use Parallels Desktop or UTM to run a Windows virtual machine and then run WinToUSB inside that VM. Linux users can install Windows in a VirtualBox or KVM virtual machine and run WinToUSB from there, though USB passthrough can be tricky to configure.
- macOS Intel: Use Boot Camp to install Windows, then run WinToUSB
- macOS Apple Silicon: Run Windows in Parallels or UTM, then use WinToUSB
- Linux: Install Windows in VirtualBox/KVM with USB passthrough enabled
- Alternative: Use Ventoy (cross-platform) for basic bootable USB creation, though it lacks Windows To Go functionality
Pro tip: If you are on a Mac and only need a Windows installation USB (not Windows To Go), consider using the free tool balenaEtcher instead. For actual portable Windows that runs from the USB drive, WinToUSB from a Windows environment is still the most reliable option.
See our features overview for everything WinToUSB can do on a Windows host.
Is WinToUSB completely free to use?
WinToUSB offers a Free edition that handles the core task of creating portable Windows drives at no cost. The Free edition supports creating Windows To Go workspaces from ISO, WIM, ESD, and SWM files, plus creating bootable Windows installation USB drives and WinPE media. It is free for personal, non-commercial home use only.
The Free edition has a few limitations compared to the paid versions. It does not support cloning your current Windows installation to a USB drive, does not include BitLocker encryption for the portable workspace, and lacks the Delta Clone feature for incremental updates. The Free edition also displays a brief splash screen on launch and limits you to creating Windows To Go drives from non-Enterprise editions of Windows (Home, Pro). Enterprise edition ISOs require the paid Professional or Enterprise license.
- Free edition: Create Windows To Go from ISO/WIM, create installation USB, create WinPE USB
- Professional ($29.95): Adds cloning, BitLocker, Delta Clone, Enterprise ISO support, commercial use
- Enterprise ($199.95-$299.95): Everything in Pro plus mass deployment, volume licensing, priority support
Pro tip: For most home users who want to put Windows 11 on a USB drive from an ISO file, the Free edition does everything you need. You only need the Professional edition if you want to clone your existing Windows installation or encrypt the drive with BitLocker.
Download the Free edition from our download section to get started right away.
What is the difference between WinToUSB Free and Professional?
The main difference is that WinToUSB Professional ($29.95) unlocks cloning, encryption, and commercial use rights that the Free edition lacks. For creating a basic portable Windows drive from an ISO file, both editions produce identical results.
WinToUSB Professional adds five features over the Free edition. First, it can clone your currently running Windows installation directly to a USB drive, preserving all your apps, settings, and files. Second, it supports BitLocker drive encryption on the portable Windows workspace. Third, it includes Delta Clone technology, which lets you update an existing Windows To Go drive incrementally instead of rebuilding from scratch. Fourth, it supports creating Windows To Go from Enterprise edition ISOs. Fifth, it is licensed for commercial and business use, while the Free edition restricts you to personal home use only.
- Clone Windows: Only in Professional and Enterprise editions
- BitLocker encryption: Only in Professional and Enterprise
- Delta Clone updates: Only in Professional and Enterprise
- Enterprise ISO support: Only in Professional and Enterprise
- Commercial use: Professional allows business use; Free is home-only
- Price: Free ($0), Professional ($29.95 one-time), Enterprise ($199.95+)
Pro tip: If you are buying for a team or business, the Enterprise edition ($199.95 for 5 PCs, $299.95 for unlimited) includes priority email support and volume deployment tools that Professional does not.
Compare features side by side on our features section.
How do I download and install WinToUSB step by step?
Installing WinToUSB takes about 2 minutes. Download the 29 MB installer from our download section, run it, and follow the standard setup wizard. The installer does not bundle any third-party software or toolbars.
The full installation process has five straightforward steps. The installer supports Windows 7 through Windows 11 on both 32-bit and 64-bit systems. You need administrator privileges to install because WinToUSB requires low-level disk access to create bootable drives. The application installs to approximately 100 MB on your system drive and does not add startup entries or background services.
- Download WinToUSB_Free.exe (29 MB) from our download section
- Double-click the installer. If Windows SmartScreen appears, click “More info” then “Run anyway”
- Accept the license agreement and choose the installation folder (default is C:Program FilesHasleoWinToUSB)
- Optionally uncheck “Send anonymous usage statistics” if you prefer
- Click Install, wait about 30 seconds, then click Finish to launch WinToUSB
Pro tip: If you want a portable version that does not require installation, WinToUSB does not offer one officially. However, you can install it to a USB drive and run it from there on any Windows PC by installing to a custom folder on your USB stick.
For a complete walkthrough with screenshots, see our getting started guide.
How to fix WinToUSB installation errors on Windows?
Most WinToUSB installation errors are caused by antivirus interference, insufficient permissions, or corrupted downloads. The first thing to check is whether your antivirus software is blocking the installer, since real-time protection sometimes quarantines the file before installation completes.
WinToUSB requires administrator privileges to install because it accesses low-level disk management APIs. If you are running a standard user account, right-click the installer and select “Run as administrator.” On corporate machines with group policies, you may need IT to whitelist the application. If the installer itself appears corrupted (stops mid-install, throws unexpected errors), re-download it and verify the file size is approximately 29 MB.
- Temporarily disable your antivirus real-time protection, then run the installer again
- Right-click the installer and select “Run as administrator”
- If the installer file is smaller than 25 MB, it downloaded incompletely. Delete it and re-download
- Clear your temp folder (Win+R, type %temp%, delete contents) and retry
- If the error persists, try installing in Windows Safe Mode
- As a last resort, download the installer from a different browser to rule out download corruption
Pro tip: The error “WinToUSB installation failed” with no further details almost always means Windows Defender or another antivirus quarantined a file mid-install. Check your antivirus quarantine list and restore the file, then add an exception for the Hasleo folder before retrying.
If installation succeeds but the app will not open, see the troubleshooting section below or visit our getting started guide.
How to fix WinToUSB not booting from USB drive?
Boot failures are the most common issue WinToUSB users face, and the cause is almost always a BIOS/UEFI configuration mismatch between how the drive was created and how the PC tries to boot. If your Windows To Go drive was created with GPT partitioning (the default and recommended setting), you must boot in UEFI mode, not Legacy BIOS.
Several factors contribute to boot problems. The target PC may have Secure Boot enabled, which can block unsigned bootloaders on the USB drive. The BIOS boot order may not prioritize USB devices. Some PCs have “Fast Boot” enabled, which skips USB enumeration entirely. Additionally, some USB controllers do not play well with certain flash drives, particularly on USB 3.0 ports with older firmware. Reddit users frequently report that switching from a USB 3.0 port to a USB 2.0 port resolves boot failures on older machines.
- Enter your BIOS/UEFI settings (usually Del, F2, or F12 during startup)
- Disable Secure Boot under the Security or Boot tab
- Disable Fast Boot if the option exists
- Set the boot order so USB drives are listed before the internal hard drive
- If using GPT: set boot mode to UEFI Only. If using MBR: set to Legacy/CSM
- Try a different USB port, preferably USB 2.0 on the back panel of a desktop PC
Pro tip: If you get the INACCESSIBLE_BOOT_DEVICE blue screen error during the first boot, recreate the drive using “Legacy” installation mode in WinToUSB instead of “VHD.” Forum users and the Windows Forum community consistently report that Legacy mode produces fewer first-boot BSODs, especially on external SSDs.
For drive creation best practices, see our getting started guide.
Why is WinToUSB taking so long to create the drive?
Long creation times are normal when using slow USB flash drives. A typical USB 3.0 flash drive with 30-50 MB/s write speed takes about 20-30 minutes to create a Windows 11 To Go workspace. USB 2.0 drives with 5-10 MB/s write speed can take 2-3 hours or more. External SSDs complete the same operation in 8-12 minutes.
The creation process involves formatting the drive, extracting the Windows image (5-6 GB for Windows 11), writing system files, and configuring boot records. The formatting step alone can take 45+ minutes on large flash drives (256 GB+) because WinToUSB performs a full format by default. The bottleneck is always the USB drive’s write speed, not your PC’s CPU or RAM. Forum reports on the EasyUEFI forums confirm that users with Axe Memory 500 GB flash drives experienced 45+ minute formatting stages.
- USB 2.0 flash drive: 2-3 hours (avoid if possible)
- USB 3.0 flash drive: 20-40 minutes depending on drive quality
- USB 3.0 external HDD: 15-25 minutes
- USB 3.0/3.1 external SSD: 8-12 minutes
- Thunderbolt SSD: 5-8 minutes
Pro tip: Do not let your PC go to sleep during the creation process. Reddit users report that sleep interruptions corrupt the drive and force you to start over. Disable sleep temporarily via Settings > System > Power & sleep, or move your mouse periodically during long writes.
Check our system requirements for recommended drive specifications.
How to fix the WinToUSB clone error “Failed to run system API”?
The “Failed to run system API” error during cloning usually means WinToUSB cannot access the target drive’s partition structure due to permission issues, a locked disk, or a conflict with another disk management tool. This error appears specifically when using the Clone Windows feature (Professional/Enterprise edition only).
The error occurs most frequently when the target USB drive has an existing partition that Windows is actively using, when another disk utility (like Disk Management or AOMEI) has a lock on the drive, or when the drive has bad sectors that prevent partition operations. The issue has been documented extensively on MiniTool’s support site and the EasyUEFI forums, with six common fixes that resolve it for most users.
- Close all other disk management tools (Disk Management, AOMEI, MiniTool, etc.)
- Remove and reinsert the USB drive, then restart WinToUSB
- Run WinToUSB as administrator (right-click > Run as administrator)
- Use Disk Management to delete all partitions on the target drive first, then try cloning again
- Check the drive for bad sectors using CrystalDiskInfo or chkdsk /r before retrying
- If the error persists, try a different USB drive to rule out hardware failure
Pro tip: This error appears more often when cloning to flash drives than to external SSDs. Flash drives with poor write endurance develop bad sectors over time. Test your drive with H2testw (free) to verify its actual usable capacity and health before cloning.
For alternative methods, see our getting started guide which covers creating Windows To Go from an ISO instead of cloning.
How do I update WinToUSB to the latest version?
WinToUSB does not auto-update silently. To check for updates, open WinToUSB, click Help in the menu bar, then click “Check for Updates.” If a new version is available, it will show you the download link. Alternatively, download the latest installer (currently version 10.5) from our download section and install it over the existing version.
Installing a new version over an old one is safe and preserves your license key if you use the Professional or Enterprise edition. The installer detects the previous installation and upgrades in place without losing settings. You do not need to uninstall the old version first. Hasleo releases updates every few months, with version 10.5 released on January 21, 2026. Major updates typically add support for new Windows builds, fix boot compatibility issues, and improve drive creation speed.
- Open WinToUSB and click Help > Check for Updates
- If an update is available, click the download link to get the new installer
- Close WinToUSB completely before running the new installer
- Run the new installer. It will upgrade the existing installation automatically
- Relaunch WinToUSB to confirm the new version number in Help > About
Pro tip: Subscribe to the Hasleo blog or RSS feed at easyuefi.com to get notified about new releases. Major version jumps (e.g., 9.x to 10.x) sometimes change the license model, so read the changelog before upgrading if you have a paid license.
Download the latest version from our download section.
What is new in the latest version of WinToUSB?
WinToUSB 10.5, released January 21, 2026, adds support for Windows 11 ARM64 ISO images and improves compatibility with UEFI CA 2023 secure boot certificates. This version also includes performance improvements for the drive creation process and bug fixes for several reported boot issues on newer hardware.
The 10.x branch introduced several notable improvements over version 9.x. ARM64 support lets users create portable Windows 11 installations for Qualcomm Snapdragon-based PCs and Surface Pro devices with ARM processors. The UEFI CA 2023 compatibility ensures that portable drives boot correctly on machines with updated UEFI firmware that enforces the 2023 certificate authority. Earlier versions of WinToUSB would fail to boot on these machines because the bootloader was signed with an older certificate.
- Windows 11 ARM64 ISO support for Snapdragon-based PCs
- UEFI CA 2023 secure boot compatibility
- Faster drive creation on USB 3.1 and Thunderbolt connections
- Fixed INACCESSIBLE_BOOT_DEVICE errors on certain NVMe-to-USB enclosures
- Improved VHD/VHDX dynamic disk handling
- Bug fixes for delta clone failures on large drives (500 GB+)
Pro tip: If you are having boot issues with a portable drive created by an older WinToUSB version, recreate the drive using version 10.5. The UEFI CA 2023 fix alone resolves a significant percentage of boot failures on 2024-2026 hardware.
Get version 10.5 from our download section.
WinToUSB vs Rufus – which is better for portable Windows?
WinToUSB is better for creating portable Windows To Go drives. Rufus is better for creating standard Windows installation USB drives. They serve different primary purposes despite some overlap.
Rufus is a free, open-source tool (1.4 MB) focused on creating bootable USB drives for installing Windows, Linux, or other operating systems. It writes ISO images to USB drives quickly and can bypass Windows 11 hardware requirements. However, Rufus’s Windows To Go feature is basic: it supports only ISO-based creation, does not handle VHD/VHDX formats, and cannot clone an existing Windows installation. WinToUSB (29 MB) was built specifically for Windows To Go. It supports ISO, WIM, ESD, SWM, VHD, and VHDX source formats, can clone your running Windows to USB, and offers BitLocker encryption (in paid editions). Rufus’s Windows To Go option has been inconsistent across versions, with some releases missing it entirely.
- Windows To Go creation: WinToUSB wins. Purpose-built wizard with more source format support
- Windows installation USB: Rufus wins. Faster, simpler, more widely tested
- Clone existing Windows: Only WinToUSB (Professional edition)
- BitLocker support: Only WinToUSB (Professional edition)
- Price: Both have free editions. Rufus is fully free and open-source
- Linux support: Rufus supports Linux ISOs, WinToUSB is Windows-only
Pro tip: Keep both tools. Use Rufus for making quick Windows installation USBs and Linux live drives. Use WinToUSB when you need a fully functional portable Windows environment that boots and runs from the USB like a regular PC.
See our features section for everything WinToUSB offers beyond basic USB creation.
What are the best free alternatives to WinToUSB?
The closest free alternatives to WinToUSB for creating portable Windows drives are Rufus, Ventoy, and AOMEI Partition Assistant. Each tool handles a slightly different use case, and none of them match WinToUSB’s full feature set for Windows To Go creation.
Rufus (free, open-source, 1.4 MB) can create Windows To Go drives from ISO files but lacks cloning, VHD support, and BitLocker integration. Ventoy (free, open-source) takes a different approach: it creates a multi-boot USB where you drop ISO files onto the drive and select which one to boot. Ventoy does not create a persistent Windows installation on the USB; it boots the ISO directly. AOMEI Partition Assistant (free edition) includes a “Windows To Go Creator” feature that works similarly to WinToUSB but is limited to Enterprise edition ISOs in the free tier. Microsoft’s own Windows To Go feature was deprecated in Windows 10 version 2004 and removed entirely, which is why third-party tools like WinToUSB exist.
- Rufus: Best for quick bootable USBs, basic Windows To Go, Linux support
- Ventoy: Best for multi-boot USB with multiple ISO files, no permanent install
- AOMEI Partition Assistant: Windows To Go feature, but free edition is limited
- balenaEtcher: Simple image writing only, no Windows To Go support
Pro tip: If you just need to boot a Windows ISO once for troubleshooting or installation, Ventoy is the fastest option. Drop the ISO on the USB drive and boot. For a persistent portable Windows environment that saves your files, apps, and settings between sessions, WinToUSB is the better choice.
Download WinToUSB from our download section and decide for yourself.
Can WinToUSB bypass Windows 11 TPM and Secure Boot requirements?
Yes, a portable Windows 11 installation created by WinToUSB does not enforce TPM 2.0 or Secure Boot checks when booting from a USB drive. This means you can run Windows 11 from a USB drive on hardware that Microsoft officially does not support for a standard installation.
When Windows 11 is installed the traditional way (to an internal drive), the installer checks for TPM 2.0, Secure Boot, and a supported CPU generation. Windows To Go workspaces bypass these checks because the portable OS is designed to run on varying hardware. WinToUSB leverages this by creating a fully functional Windows 11 environment on USB that boots on older PCs, including machines with 6th and 7th generation Intel processors, AMD Ryzen 1000 series, or systems without TPM 2.0 modules. This has made WinToUSB popular among users who want to try Windows 11 on older hardware without modifying their existing system.
- The USB-booted Windows 11 runs without TPM 2.0, Secure Boot, or CPU generation checks
- Works on PCs with older Intel (4th gen+) and AMD processors
- Windows Update still functions, though Microsoft may restrict future updates on unsupported hardware
- Disable Secure Boot in BIOS before booting the portable Windows 11 drive
Pro tip: While the portable Windows 11 runs without TPM, BitLocker encryption on the portable drive itself requires TPM or a startup PIN. If you need encryption on the portable workspace (Professional edition), set up a startup PIN instead of relying on TPM.
Learn how to set this up in our getting started guide.
How do I clone my existing Windows to a USB drive with WinToUSB?
Cloning your current Windows installation to a USB drive requires WinToUSB Professional ($29.95) or Enterprise edition. The Free edition does not include the clone feature. The process copies your entire Windows OS, installed programs, settings, and user files to a portable USB drive that boots independently.
The cloning wizard in WinToUSB creates an exact copy of your running Windows environment. Your source drive remains untouched. The target USB drive must be at least as large as the used space on your system partition. For example, if your C: drive uses 80 GB of space, you need a USB drive with at least 80 GB of available capacity. External SSDs are strongly recommended for cloning because the resulting portable OS will be as fast as the drive allows. A cloned Windows on a USB 2.0 flash drive will be painfully slow.
- Connect your target USB drive (SSD recommended) and launch WinToUSB
- Click the “Windows To Go USB” option on the left panel
- Select “Current Windows OS” as the image source instead of an ISO file
- Choose your USB drive as the destination and select the partition scheme (GPT for UEFI)
- Select “Legacy” as the installation mode for best compatibility
- Click “Proceed” and wait for the clone to complete (20-60 minutes depending on drive speed and data size)
Pro tip: After cloning, boot the USB drive and immediately run Windows Update to install drivers for the new hardware. Installing NVIDIA or AMD GPU drivers on the portable drive can cause boot failures on machines with different GPUs. Stick with the default Microsoft display driver for maximum portability.
See our features section for more details on the clone and Delta Clone capabilities.
What file formats does WinToUSB support as source images?
WinToUSB supports seven source formats for creating portable Windows drives: ISO, WIM, ESD, SWM, VHD, VHDX, and physical CD/DVD. This is broader than most competing tools, which typically only support ISO files.
ISO files are the most common format and what you download from Microsoft’s website. WIM (Windows Imaging Format) and ESD (Electronic Software Download) are compressed image formats found inside Windows ISO files and used by the Windows ADK. SWM (Split WIM) files are WIM images split across multiple files, sometimes used for distribution on FAT32-formatted media. VHD and VHDX are virtual hard disk formats used by Hyper-V and other virtualization platforms. WinToUSB can convert these directly into bootable USB workspaces without requiring an intermediate conversion step. The software also reads directly from physical Windows installation CDs or DVDs if your machine has an optical drive.
- ISO: Standard disc image from Microsoft, most common
- WIM: Windows Imaging Format, found in install.wim inside ISOs
- ESD: Compressed Windows download format, smaller than WIM
- SWM: Split WIM files for FAT32 distribution
- VHD/VHDX: Virtual hard disk files from Hyper-V
- CD/DVD: Physical Windows installation media
Pro tip: If you have a Windows ISO from Microsoft and WinToUSB says it cannot find any Windows editions inside it, the ISO may be a recovery image rather than an installation image. Download a fresh ISO from microsoft.com/software-download/windows11 using the “Download Windows 11 Disk Image (ISO)” option for guaranteed compatibility.
See our features overview for full format compatibility details.
Still have questions? Try WinToUSB yourself and see how simple portable Windows can be.
Download WinToUSB Free